Our 12 Decorating Projects for Christmas
December 02, 2016
Happy holidays everyone! We are committed to helping our readers have a clean and healthy home. We typically like to blog about topics including carpet cleaning and how we can help remove dust and dirt from your home.
This Christmas season we decided to focus on helping you have a happy, healthy holiday. We’re serving up a series of DIY holiday decorating projects ... twelve to be exact (a nod to the “Twelve Days of Christmas” carol we all know and love). These projects are great to do with family and friends and fit nicely with the “clean and healthy home” theme of our blog.
You can make them as gifts or to decorate your own home this season. We will be posting these projects regularly so keep coming back for more!
Don't miss our other projects below:
- Edible Advent Calendar
- Simple Christmas Garland
- Paper Snowflakes
- Glitter Ornaments
- Pinecone Ornaments
- Christmas Candelabra
- Christmas Candle Centerpiece
- Christmas Bowl Display
- Snowman Ornament
- Christmas Stocking
- Holiday Wreath
- Handprint Ornament
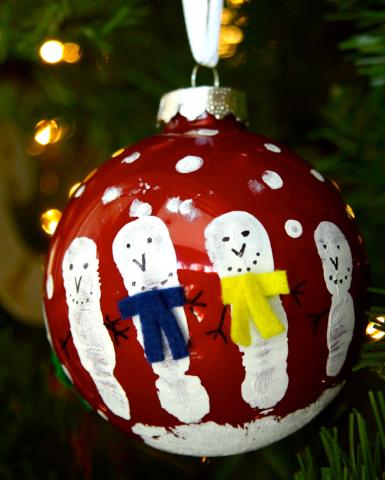
#12 Handprint Ornament
The 12th and final in our series of Holiday Decorating Projects is a fun and engaging one for those of you with children. It’s perfect to use as a decoration on your own tree or as a gift for family and friends. These handprint ornaments are easy and require minimal materials. The kids will love getting messy with the paint, too!
Materials you’ll need
- Large colored glass ball ornaments — Large, solid-colored ornaments work best.
- White craft paint — Non-toxic white craft paint that will dry quickly and be safe for the kids makes clean-up easier.
- Small paint brush
- Sharpie(s) – Black and orange but you can use additional colors and get creative!
- Felt material – Black for hats and other colors for miniature scarves.
- Glue gun & glue sticks
Assembling the piece
- Cut felt material into tiny rectangle strips for scarves. Cut black felt into triangles for tiny hats.
- Using the paint brush, apply the white craft paint to your child’s hand covering the palm and all fingers.
- Place the ornament in the middle of your child’s flat palm with fingers extended. Have your child slowly close their hand so it wraps around the ornament. Be sure they don’t wiggle their fingers! Slowly remove the ornament from the child’s palm. Set the ornament somewhere safe to dry. Wait at least two hours for the paint to fully dry. Send the kids off to wash their hands.
- After the paint is dry use the black sharpie to add faces on each finger snowman. You can add stick arms, noses and smiles too!
- Use the orange sharpie to color the snowman noses.
- Use the glue gun to attach the black felt triangle hats and the colored felt strips as scarves to each snowman. Allow to dry until glue sets (about 30 minutes).
- You can be creative and add snow falling with a small paint brush and the white craft paint.
- Let your child sign their name and put the year or any other message in the palm section of the ornament.
You now have a really nice keepsake ornament. This project is ideal for making multiple ornaments that you can give out to family and friends. Your entire family will enjoy this fun project and the memories of making these for years to come!
#11 Holiday Wreath
Our next project is a simple, elegant take on a classic holiday wreath. It’s sure to spruce up your collection of holiday decorations. Round wreaths are more traditional but you can opt to make a star-shaped wreath, or any other shape you prefer following these same instructions.

Materials you’ll need
- 26 gauge floral wire
- 12” Wreath Form – These are typically inexpensive and can be found at your local craft store like Michael’s or JoAnn’s.
- Cedar Sprigs – You can opt for real sprigs from your local florist, tree farm or even your own yard OR, if you’d like to use the wreath again next Christmas, you can use artificial sprigs from the craft store.
- 6 ft. Ribbon of Your Choice
- Microfilament (fishing line)
- Decorations of your choice – Feel free to use small ornaments, jingle bells, pinecones or other pieces to decorate the finished wreath and add a little extra color and personality. You can even use small strings of battery-powered Christmas lights. This is your chance to be creative and make this wreath truly unique!
Assembling the Wreath
- Cut cedar branches to about six inches in length. Length may vary if you’re using a different size wreath form. Adjust the length accordingly.
- Gather branches together into thick bundles and tie them together using floral wire.*
* A 12” diameter form will be around three feet in circumference so you’ll need enough cedar sprigs to make six or seven of these bundles.
- Attach the end of the floral wire to a point on the wreath form you wish to designate as the top.
- Working from that point, lay cedar bundles along the form and secure them by coiling floral wire around the form and cedar bundles working your way around and down.
- Lay the next bundle in place with a little bit of overlap. Continue wrapping without cutting the wire.
- Repeat this process until the entire form is covered and wrapped, and you’ve worked your way back around to the top of the wreath.
- Cut the wire at the top leaving a two-inch tail that you can form into a loop for hanging.
- Use the ribbon and microfilament for hanging.
- Add any additional decorations using the microfilament, floral wire or ribbon to attach to the wreath.
When you’re done, you have a unique, beautiful wreath to use as a decoration on the front door or to hang above the mantle. If you’re really crafty, spread a little extra holiday cheer by making more than one and giving them as gifts to friends and family!
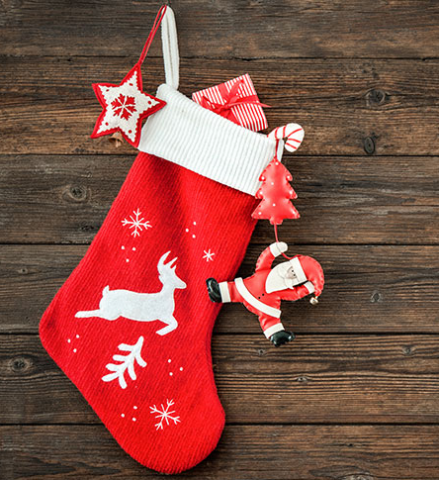
#10 Christmas Stocking
Up next is our take on a timeless holiday tradition, the Christmas stocking. Having your own stocking to hang over the mantle is year after year is a tradition everyone loves from childhood into adulthood.This project is one that is definitely a little more involved than the other crafts we’ve shared. It’s perfect for the experienced craft enthusiast but isn’t too difficult for the adventurous beginners out there either. The end result is a durable stocking that can be enjoyed for years to come.
Materials you’ll need
- Fleece fabric — Two colors of your choice: one color to form the body, and another to form the cuff. The classic combo is red and white, but you can choose any colors that suit your needs.
- Stocking pattern — Inexpensive patterns are easy to find at a local fabric store but Christmas stockings are such a simple shape that you could make your own pattern freehand as well.
- Sewing machine
- Sewing scissors
- Straight pins
Assembling the piece
- Cut out stocking pattern(s) onto your chosen body fabric and pin in place.
- Follow the pattern to cut out stocking body from fabric. Remember, you’ll need two of these for each stocking you make.
- Use the same process and follow the same order with cuff pattern and fabric. Set aside a scrap piece of fabric about ⅜ inches wide and 3 inches long. You’ll use this piece to form the hanging loop.
- Place stocking body pieces with the inside facing up onto your work surface
- Place cuff pieces outside-up such that they overlap about ⅜ inches onto the top edge of the stocking body
- Pin the overlapping pieces together.
- Stitch the seam together with a sewing machine. Each of these forms a complete half of the stocking.
- Fold your small scrap piece of fabric lengthwise and lay the matched ends together into the seam between the cuff and the rear of the stocking body. Pin the loop piece in place so that the ends will be captured by the seam stitching.
You should now have two halves of a stocking, and one halve should have the hanging loop piece pinned in place.
- Take your two stocking halves and lay them together with the insides of the stocking facing out
- Pin the halves together along the edges and stitch them remembering not to stitch the opening shut.
- Turn the stitched stocking right-side out and fold the cuff down into its proper position.
You now have a nifty little fleece stocking that you or the person you made this for will enjoy for years to come. You can decorate this further with some fabric glue and a few felt pieces cut into shapes like snowflakes, stars, snowmen, or lettering if you want. If you run through this process more than once your speed and efficiency will pick up. Once you’ve got the hang of it you can scale the pattern larger or smaller and to use as decoration or even as a wrapping for gifts (two gifts in one present!).
#9 Snowman Ornament

Our next project is definitely a classic in the line of holiday decorating staples. This fun snowman ornament can be made to match any style – you can make it really fancy or keep it super simple. It’s also another great project for the whole family. Kids will love to help out and you can make an entire snowman family with a few adjustments to the materials list. Just make sure to leave the knife-cutting to the grown ups.
Materials you’ll need
- Styrofoam balls — At least two of different sizes. We use two (larger one for the body, smaller one for the head) but you can use three if you wish.
- Cotton balls
- Hot glue gun and glue sticks
- Small buttons — At least two and they don’t have to match.
- Hole punch and black construction paper — These will be used to make the eyes.
- Serrated Knife
- Orange felt
- Floral wire, pipe cleaners or an old woolen glove — These will make the arms of the snowman. If you choose the woolen glove, you’ll be cutting the fingers off to use instead of forming them from floral wire.
- String or ribbong & ornament hook – If you chose to make this an ornament, you’ll want these to be able to hang on the tree!
Assembling the ornament
- Using the serrated knife, slice two flat spots on opposing sides of the larger of the styrofoam balls. Next, cut one flat surface into the smaller ball.
- Rest the larger ball on your work surface and hot-glue the flat surface of the smaller ball and join it to the face up flat surface of the larger ball.
- Unroll your cotton balls so that you have several thin sheets of cotton fiber. Wrap these around the styrofoam balls and glue them in place until fully covered with white fluff.
- Glue the buttons vertically down the front of the bottom of the snowman. Next glue two of the punched out holes from the black paper horizontally across the front of the smaller styrofoam ball just above the center axis to form the eyes.
- Cut a small triangle from the orange felt and roll it into a cone shape and glue it to the center of the smaller styrofoam ball, just below the eyes to form the carrot-looking nose.
- Form the arms of the snowman using a couple of short pieces of floral wire or pipe cleaners OR by gluing on two cut-off fingers from a woolen glove.
And that’s it. You can use this ornament in a display or you can fix a hook or piece of string to the top and hang it on your tree. You can also “dress it up” a little more by adding a scarf and hat using ribbon, scrap felt or scrap pieces of fleece if you have some on hand. Either way, this is a fun and festive project the whole family will enjoy!
#8 Christmas Bowl Display
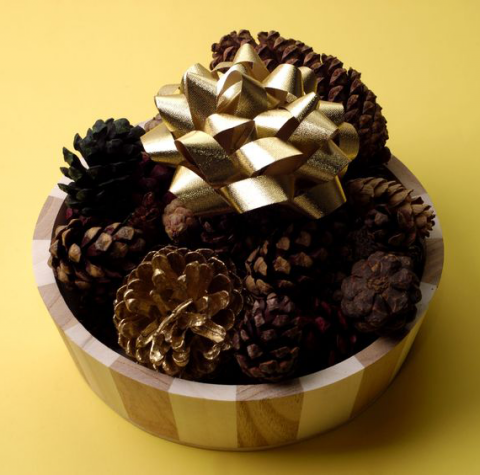
To wrap up our second week of Christmas decorating projects, we’re offering up a simple one with infinite possibilities…an eye-catching Christmas Bowl display. The best thing about this project is that you probably already have everything on hand that you’ll need to assemble this piece. If you have leftover pine cones from the pine cone ornament project earlier this week, you can use them to make in this Christmas bowl display. If you made the Christmas candle centerpiece with cedar sprigs or the glitter ornament, you can use leftovers from those projects for this purpose as well.
The process is simple. Start by getting a large bowl – even a serving bowl would do, but if you have something more unique, novel, and decorative, that would be better. Gather together any holiday themed items you have such as pine cones, cedar sprigs, and ornaments. Assemble them in the bowl in a way that balances colors and textures. Top it off with a simple bow or even a candle if you want. Then set the display in some central location like a counter or coffee table or fireplace mantle so everyone can enjoy the warm and festive touch that it brings.
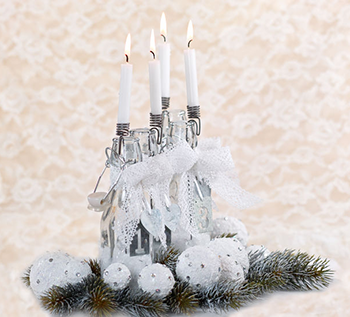
#7 Christmas Candle Centerpiece
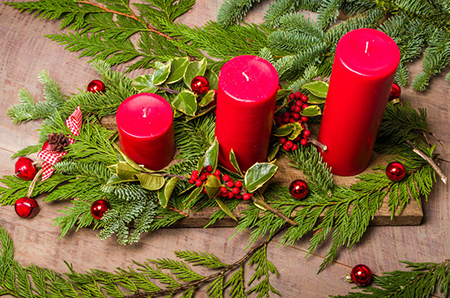
Our next project is a neat Christmas Candle Centerpiece that is the perfect decorative hub to set your holiday table around. It’s inexpensive and easy to make. You’ll find it’s also easy to store so you can use it year after year.
Materials you’ll need
- 3 pillar candles — You can choose candles of the same length or you can choose the three-tiered step-down style if you prefer. Christmas colors like red, green, or white are best for this application. If you choose three different lengths make sure the difference is consistent (e.g., two-inch, four-inch, and six-inch, respectively).
- Length of board approximately ½’ thick and 5” x 12” long — Any old piece of wood will do—finished, unfinished, oxidized, salt-pickled, or whatever—so long as it matches your desired aesthetics. You could also buy a piece of lumber cut to length and then stain or paint it any way you like. If you know a local cabinet shop, you can call and ask them to cut you a plain length of board from their hardwood scraps. Craftsmen are almost always willing to help out with a creative project!
- Pencil and ruler (or tape measure)
- 3 small nails and a finish hammer — Tico nails are perfect for this. They’re easy to drive by hand, they’re the perfect length, and they can be bought cheaply at any hardware store.
- Sprigs of cedar, holly, pinon and/or juniper — Artificial sprigs are preferable because they’ll be reusable and more fire safe.
- 4-5 small Christmas ornaments – Your choice. Be as creative as you want with your choices.
Assembling the piece
- First things first: Decide which side of your board you want face up and lay the board with your chosen face-side down. Using the pencil and ruler or tape measure, find the long axis of your board by measuring in from the side edge near each end and leaving a faint mark near each end of the board at 2 ½ inches in from the edge.
- Lay the ruler or any straight edge along the axis of the board so that the edge of the ruler just touches your marks but leaves them visible. Trace a faint pencil line along the edge of your ruler. This line is the axis of the board.
- Measuring now from the end of the board along the axis mark you’ve traced, make perpendicular, intersecting marks along the axis at 3”, 6”, and 9”. Now you have the precise spacing of your candles.
- Use something like a block of wood to suspend your board above the table or counter you’re working on and drive tico nails into each of the three intersecting marks you drew on the axis of the board. Drive the nails until they’re flush to the wood, then turn the board over. You now have three precisely-spaced posts that should be about ¾” long, to mount your candles on.
- Press the center of the base of the pillar candles down onto the posts following whatever order of length you prefer—longest to shortest or vice versa.
- Decorate the open spaces of the board, between the candles and around the edges with your cedar, holly, pinion, and/or juniper sprigs and Christmas decorations.
- Place at the center of your dining table for the duration of the holiday season.
That’s it! You have a beautiful (and reusable!) centerpiece for your holiday celebrations for years to come. You can easily modify the centerpiece each year to give it a fresh look. You can also switch out the candles and decorations each season to enjoy your handiwork all year long.
#6 Christmas Candelabra
Our next project is a beautiful, festive do-it-yourself candelabra made from decorative glass bottles. Its unique charm makes it easy to match with any aesthetic, from rustic to elegant and everything in between. If you’re looking for a way to express your holiday spirit and creativity, this Christmas candelabra project will be perfect and lots of fun for you!
Materials you’ll need
- 3 – 4 Bottles — This is one of the areas where you can get really creative. Choose any type of bottle you find appealing. Some options include:
- Typical wine bottles – These are easy to acquire, have a classic look and will work nicely for bigger displays.
- Beer bottles – There are many different shapes, sizes and colors (clear, green & brown). Labels will need to be removed with soap and water. The imported Dutch beer, Grolsch, for example comes in green glass bottles with white ceramic bottle stoppers fixed to a wire hinge. With the labels cleaned off and the red lettering on the ceramic stoppers you have the perfect color balance for a Christmas motif.
- Classic Chianti bottle – Called a fiasco—Italian for ‘flask’—these bottles are known for the classic woven basket covering the body and a shorter overall height than typical wine bottles. These kinds of bottles have been used as homemade candle-holders by people all over the world. You can find various sizes and shapes of these as well.
- Antique bottles – You can source local flea market or antique dealers who collect bottles. You’ll find interesting options and the bottles don’t have to match. You can experiment with bottles of varying heights, colors and styles if that idea suits you.
- Craft stores – Most craft stores like Michael’s or Hobby Lobby carry many types of decorative bottles that are sold for this kind of project.
- 6-inch taper candles — Choose colors to match or accentuate your other décor. You’ll need the same number of candles as bottles. Craft stores have many options to choose from and your local grocery store may have some as well. Stick with six-inch candles to keep the display down to a reasonable height. That’s especially important if you’re using wine bottles. Imagine using 12-inch candles in a standard wine bottle. You’d end up with a nearly two-foot tall display piece! This would limit the places in your home where it would be practical—and fire-safe—to display it.
- Ribbon — Any kind of decorative ribbon that matches your vision.
- Wire bottle-top candle holders (optional) — In our example photo above, we use wire candle holders that mount to the top of the bottle. Having these makes replacing the candles easier, but they’re totally unnecessary. You might find them at a craft store or online. If you can’t find them, you can just mount your candles straight to the bottles.
Assembling the piece
- Clean the bottles so they’re free of labels and adhesive residue. Or, leave the labels if you prefer.
- Cut ribbon into 8-12 inch lengths, one for each bottle depending on the size of your bottle. Tie a length of ribbon in a bow around the neck of each bottle.
- Affix candles to the mouth of the bottle. If you have the wire candle holders, mount candles to holders first, and then install the assembly to the bottle. If you’re mounting straight to the bottle, you may need to shave the candle down, or cut the length down from the bottom up to give the candle base the same diameter as the bottle opening. Using a lighter or match, run an open flame around the base of the candle where it joins with the bottle to melt the candle in place.
- Arrange with a collection of ornaments around the base and place on your mantle, as a centerpiece on your table for everyone to enjoy!
And that is that. These holiday candelabras are classic and timeless decorating pieces. Once you have the supplies in your decorating kit, you can spice things up – and challenge your creative talents – by trying a different variation each year!
#5 Pinecone Ornaments
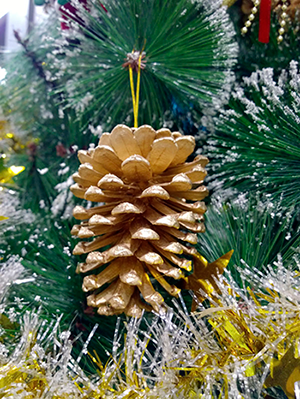
Our 5th Christmas project is simple, inexpensive and timeless. It’s a pinecone ornament. You can make this in just a few minutes. With care, these ornaments can last for years.
Did you know that conifers are an ancient species? The pinecones they produce are the evolutionary precursors to flowers and they have existed for nearly three times longer than all flowering plant species! Two other interesting facts you can wow your friends with:
- Pinecones were treated as symbols of enlightenment in ancient Egyptian, Greek, and Roman societies.
- The pineal gland, located in the geometric center of the human brain, is named for its resemblance to a pinecone.
Whether those facts interest you or not, you’ll probably agree that pinecones make great ornaments for a Christmas tree! They’re inexpensive, easy to come by, and provide a touch of natural beauty. Pinecones can also be jazzed up with minimal effort and expense. Some people like to spray paint them holiday colors like gold, silver, red, green. Others paint them white to make them look snow-crusted. You can take it to the next level by sprinkling them with glitter while the paint is still wet. Feel free to try any of those modifications that you like. But, we’re going to keep our pinecone ornament simple.
Materials you’ll need
- Pinecone(s) — Gather these yourself in advance of the holiday season or you can buy them at a local craft store like JoAnn or Michael’s.
- String, twine, or yarn — Choose anything that will match the aesthetics of your existing holiday decorations. If your style is more rustic you can go with natural, ropey twine. If your style is more colorful, there are all kinds of colored twine and yarn you can choose.
- Hot glue gun and glue sticks — If you don’t have a hot glue gun on hand, any household adhesive should work.
- Decorative Ribbon — Again, choose something that matches the aesthetics of the rest of your decor. You’ll want one length, 4-6 inches, for each pinecone. Choose ribbon width that is proportional to the size of the pinecones you’re using. ½ inch is probably a good all-around thickness.
- Stapler and staples — A regular old office stapler is just perfect.
- Optional materials – Spray paint in any color(s) you like, artificial snow aerosol spray and glitter.
Assembling the Ornament
- Cut twine into 3-4 inch lengths, one for each ornament you want to make.
- Cut ribbon into 4-6 inch lengths, one for each ornament.
- Find the center of your ribbon pieces. Fold your lengths of twine in half and staple the ends to the center point of the ribbon pieces forming a fixed loop.
- Tie ribbon pieces into a simple bow—the same knot you use to tie your shoes.
- Using the hot glue gun, glue the bow and loop assemblies to the tops of each of your pinecones.
- Set aside to dry.
Boom! You’re done. Wasn’t that easy? If you want to get more elaborate and try painting and/or glittering your pinecones, we recommend doing that before you do the steps above.
#4 Glitter Ornaments
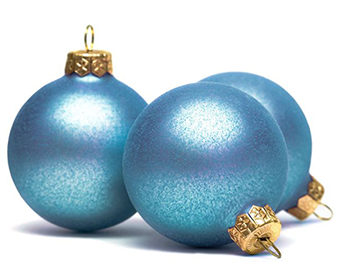
Who doesn’t love glitter? Our 4th project is a homemade glitter ornament. It’s simple, fun and the results are always unique. You could make enough of these ornaments to cover an entire tree in a couple of hours! Best of all…this project is perfect for the whole family.
Don’t be scared off by the prospect of getting glitter all over the place either. With this version, the glitter is on the INSIDE. What more could you want?
Materials you’ll need
- Clear glass ball ornaments* (most craft stores like JoAnn’s and Michael’s carry these)
*Clear plastic ornaments work great too!
- Glitter
- Floor Wax (Pledge Floor Care Multi-Surface Finish works well)
- Sheet of Paper
- Rubbing Alcohol and Cotton Balls (For cleaning)
- Household glue (Elmer’s is fine)
- Winter or Christmas Themed Scrapbooking Sticker*
*Optional
Assembling the Ornament
- Clean ornaments with rubbing alcohol and cotton balls
- Pour a small amount of floor wax into the ornament and swirl around to coat the entire inside surface.*
*Be care not to shake because that creates bubbles.
- Pour excess floor cleaner back into bottle.
- Form a funnel with the sheet of paper and pour glitter into the glass ball.
- Swirl around until the entire inside is coated with glitter.
- Leave to dry for about an hour.
- Apply a small amount of glue to the inside of caps then install caps and wires.
- For additional bling you can decorate the outside with sticker, rhinestones or anything else you can adhere to the surface.
Voila! There are so many variations you can try with these ornaments. For example, you could use glitter in the color of you or your loved ones’ birth stones, or accent colors to make your other ornaments really pop. Or you could make a bunch of these to use in a holiday garland to string across a mantle. The possibilities are nearly endless.
#3 Paper Snowflakes
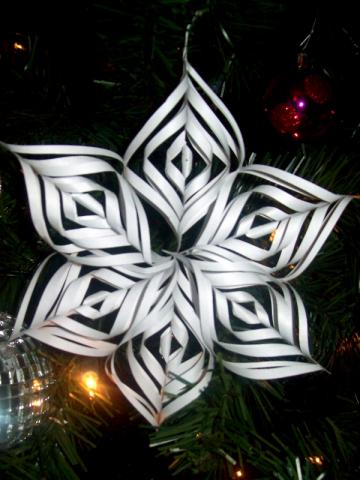
Our third festive and fun decorating project is a fairly simple one but the end result will have your friends thinking you’re some kind of origami master. You can make these 3-D snowflakes in a variety of sizes. Small snowflakes make great ornaments for the tree. Larger ones make nice party decorations.
All it takes to make these is patience and a steady hand. Kids can do these too but you may want to help the younger kids with the scissors and stapler. Just remember to think in advance about how you want to use these to determine your preferred size.
Materials You’ll Need
- Six pieces of paper cut into squares — Anywhere from 2 to 10 inches depending on the size of the snowflake you want. Two-inch squares will make about a four-inch snowflake, and so on. Any kind of paper works, but the sturdier the better to hold the snowflake shape.
- Scissors
- Scotch Tape
- Stapler — Mini staplers are the most user-friendly for this project, but any stapler will do.
Assembling Snowflakes
- Fold squares diagonally, corner-to-corner, and crease creating an obtuse triangle.
- Think of the folded edge as the base of the triangle. Fold the base corners of the triangle together and crease, creating a right-triangle.
- Continuing to think of the same folded edge as the bottom of the triangle, make three evenly spaced cuts parallel to the hypotenuse (the unfolded edge), running from the bottom toward the opposite edge stopping about a quarter-inch from the edge.
- Unfolding the triangle should reveal a square with criss-cross diagonal creases, and concentric squares, outlined by the cuts, that each have two diagonal corners still attached, while the other two are free-floating.
*The line running from the attached corners of the inner squares forms the axis of the snowflake pieces.
- Beginning with the innermost square, draw the free-floating corners so they overlap, forming a tube, and tape them together.
- Next, turn the piece over, and repeat the previous step on the opposite side with the next square.
- Continue turning the piece over, taping corners together into tube shapes until each pair of free-floating corners is taped.
- Repeat steps 1-7 with all six paper squares until you have six branches of a snowflake.
- Bundle the ends of three of your snowflake branches together and staple them, then do the same with the remaining three.
- Align the stapled ends of the two snowflake halves together and staple those.
- Arrange the branches of the snowflake so that they are symmetrical and staple where the branches touch on another to maintain the snowflake shape.
There you have it! You can staple a small loop of wrapping ribbon to the top of the snowflake for hanging purposes. You can even scale the size of these snowflakes up or down however you like. Just remember, the diameter of the finished snowflakes will be slightly less than twice the size of the squares. Smaller snowflakes may be more tedious to assemble. Larger snowflakes will require more cutting. Enjoy!
#2 Simple Christmas Garland

Up next is a project that is perfect for kids of all ages. It can be a simple or complex as you want to make it. This simple Christmas Garland can be used as decorations in your home or as gifts for friends and family.
Holiday garlands are very versatile and can be found in many shapes and sizes. For this project, we’ll be making a garland that features a message. You can choose your favorite holiday message like “Merry Christmas,” “Happy Holidays,” or something more personalized. You can also choose what kind of material your message is on (we use card stock but you could use just about any material that can be written, painted, etched or drawn on).Our version will be simple letters cut from card stock, glittered and strung together using a length of festive twine or yarn. This is a simple decoration that even kids can make. We hope you enjoy both the process and the results.
Materials you’ll need
- Card Stock — This can come from 3×5 cards or manilla folders you aren’t using. There’s no need for anything elaborate.
- Glue Stick
- Lettering Stencils and Pencil — Aim for about three-inch letters. Most craft stores sell these kinds of stencils.
- Hole Punch
- Exacto Knife and Backing Board — Any cutting board will do (Be sure to help the little ones with this!)
- Glitter
- Yarn or Twine — A 4-5 foot length should suffice, depending on how many letters.
Assembling the Garland
- Choose your message and stencil the letters onto the card stock.
- Use the exacto knife and cutting board to cut out letters.
- Punch two evenly spaced holes along the top of the cutout letters.
- Use the glue stick to cover the face of the letter with a thin coat of glue.
- While glue is still wet, sprinkle an even coat of glitter onto the glued letters and set aside to dry.
- Once dried, thread your length of yarn or twine through the punched holes in the lettering.
- Hang garland as a stand-alone piece across a wall, on a door, as part of an arrangement across a mantle or hang it on right on your Christmas tree.
- Adjust letter spacing appropriately.
And that’s it! Holiday decorations don’t get any easier than that. And it’s pretty amazing how much holiday charm a simple piece like this garland adds to a room.
#1 Edible Advent Calendar

Our first entry is both the kickoff and the conclusion to our Christmas countdown. It’s a gingerbread cookie Advent calendar that you and your family will be sure to enjoy making and eating. We hope you enjoy it!
Materials you’ll need
- Gingerbread cookie dough
- Frosting
- Food coloring
- Square cookie cutter
- Piping bag with a fine nozzle
Here’s a great gingerbread recipe if you don’t have one
Ingredients
- 3/4 cup molasses
- 1/3 cup packed brown sugar
- 1/3 cup water
- 1/8 cup butter, softened
- 3 1/4 cups all-purpose flour
- 1 teaspoon baking soda
- 1/2 teaspoon ground allspice
- 1 teaspoon ground ginger
- 1/2 teaspoon ground cloves
- 1/2 teaspoon ground cinnamon
Instructions
- Add molasses, brown sugar, water and butter together in a medium bowl and mix until smooth. Combine the flour, baking soda, allspice, ginger, cloves and cinnamon, stir them into the wet mixture until all dry ingredients are absorbed. Cover the dough and chill for at least 3 hours.
- Once chilled, roll the dough on a lightly floured surface into a ¼ inch sheet. Use the square cookie cutter to cut out shapes. Arrange gingerbread squares on a cookie sheet and bake for 8 to 10 minutes in an oven that has been preheated to 350º. Remove cookies from the cookie sheets and set aside to cool.
- Repeat as necessary until you have 25 square gingerbread cookies.
While those cookies are baking you can start the frosting mixture
Ingredients
- 1 cup confectioner’s sugar
- ¼ cup milk
- Food coloring
Instructions
- Sift the confectioners’ sugar into a small bowl. Stir in enough milk to make a smooth but not too runny consistency. You may need to adjust thickness by adding sugar.
- Divide this mixture into small containers depending on how many colors you want.
(note: You can use as many or as few colors as you want, but a good recommendation is to choose a couple of base colors, like red or green and one accent color, like white, for the piping bag, which you’ll use to make numbers and decorative designs)
- Color each container with seasonal colors, using as much food coloring as necessary.
- Divide cookies according to the number of base colors you’ve chosen and frost the square cookies with the base colors.
- Using the accent color frosting and piping bag, number the cookies 1-25.
- Add any simple decorations you like, such as snowmen, candy canes, stockings, ornaments, etc.
- Arrange the cookies into a numerically ordered square (just like a calendar) on a display platter. You can add other decorating implements to arrangement however you like.
And that’s it! Let the countdown until Christmas begin in the most delicious way possible. You can make cookies from any leftover dough as a diversion for those in your household who may lack the patience to wait for the appropriate day before eating the next cookie.
About Chem-Dry:
Chem-Dry’s professional carpet cleaners and upholstery cleaners are dedicated to making each home happier and healthier this holiday season. They are experts in carpet, upholstery and tile and grout cleaning.